유니티 AI 구현하기(Nav mesh Agent)
안녕하세요.
오리입니다
이번 편은 길을 찾아가서 행동을 하는 AI(인공지능)을 구현하는 법을 알려드리겠습니다.
먼저 A.I를 구현하기 전에 Nav mesh Agent라는 것을 알아야 합니다.

Window -> AI -> Navigation을 클릭하시면 Inspector창 옆에 Navigation창이 생길 것입니다.
그렇게 설정을 해두시고 큐브를 생성한 다음 Navigation 창에 Bake를 누릅니다.
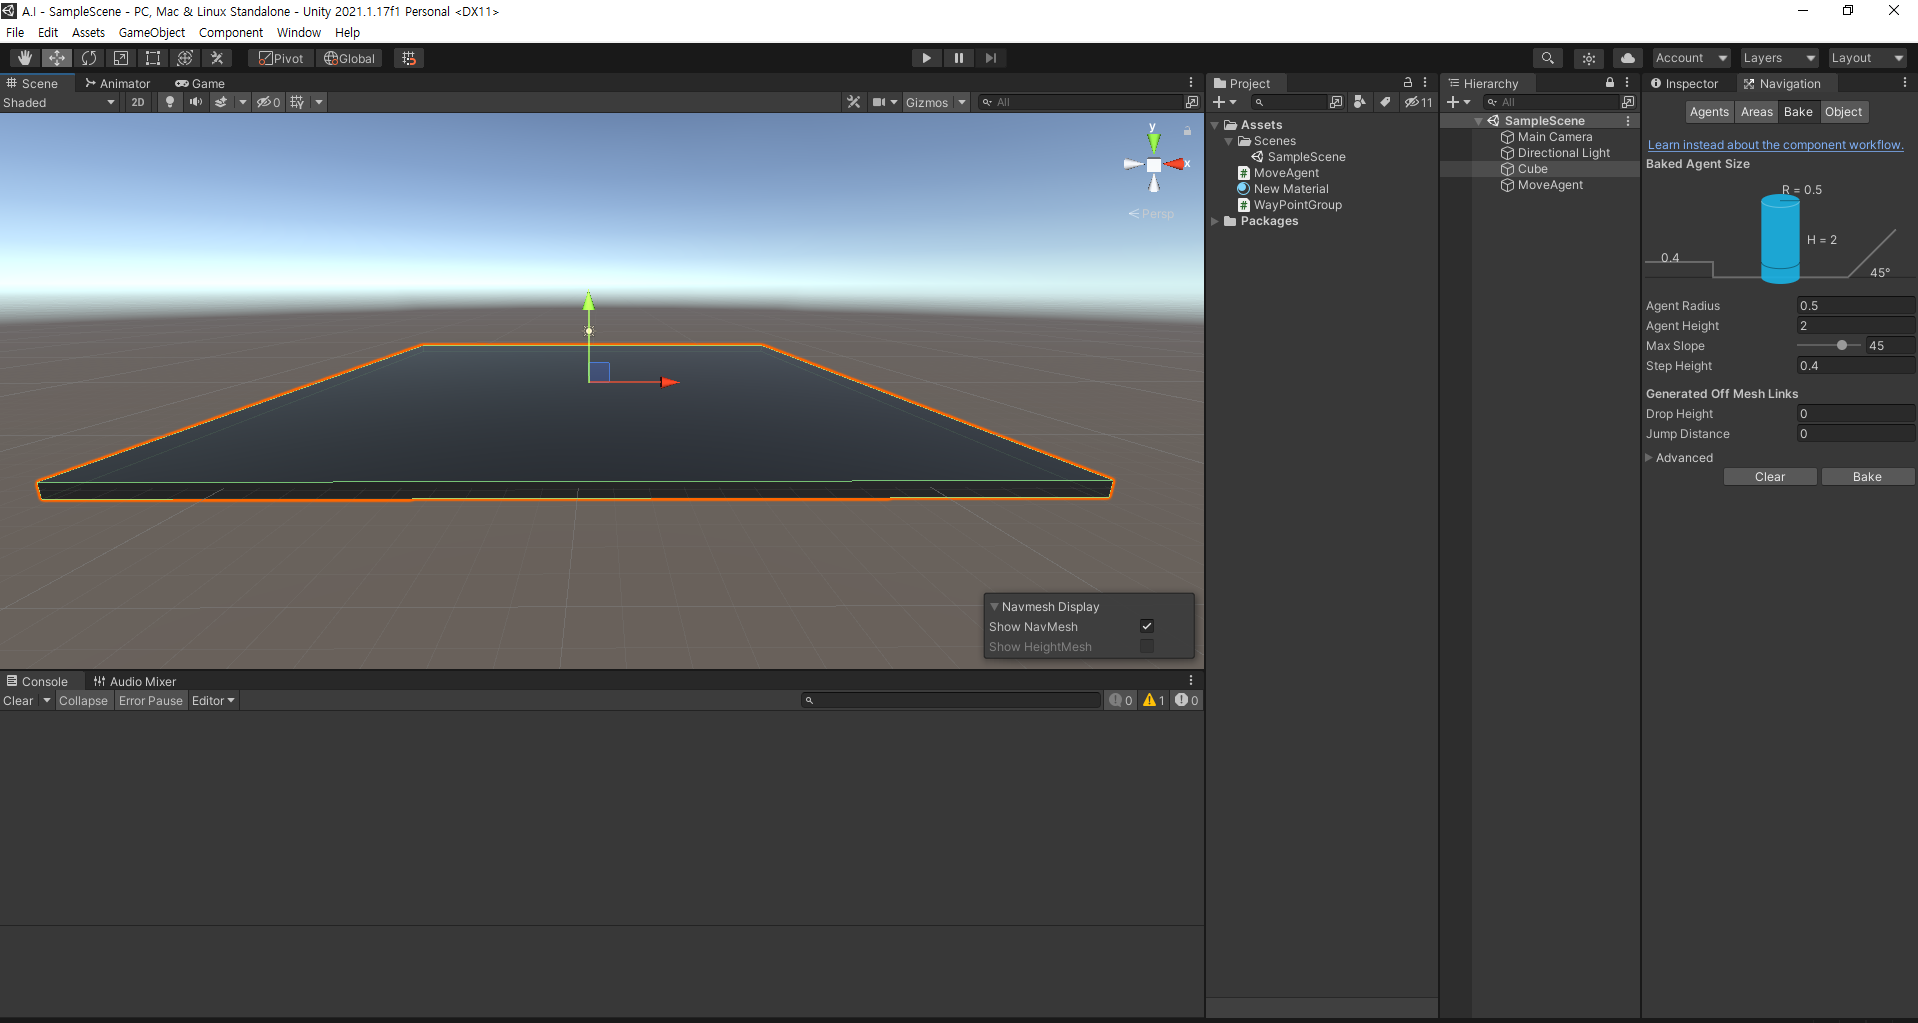
그럼 딱 이 사진처럼 나올 것입니다. 그리고 Bake를 들어가서 밑에 Bake를 누르고 나면

이렇게 나올 것입니다. 저렇게 푸른 화면을 뛴 곳이 이제 AI들이 돌아다닐 수 있는 구역입니다.

그런 다음에 빈게임오브젝트를 만들어 이름을 WayPointGroup으로 바꾸고 WayPointGroup스크립트를 만들어 컴포넌트 시켜줍니다.
using System.Collections;
using System.Collections.Generic;
using UnityEngine;
using UnityEngine.Assertions;
public class WayPointGroup : MonoBehaviour
{
public static WayPointGroup instance = null;
public List<Transform> wayPoints;
private void Awake()
{
if (instance == null)
instance = this;
Init();
}
private void Init()
{
GetComponentsInChildren<Transform>(wayPoints);
wayPoints.Remove(this.transform);
}
public bool IsValid(int idx)
{
return (idx >= 0 && idx < wayPoints.Count);
}
public Vector3 GetPoint(int idx)
{
Assert.IsTrue(IsValid(idx));
return wayPoints[idx].position;
}
}
이제 WayPointGroup오브젝트 안에 자식으로 Way라는 빈게임오브젝트를 만들어 MyGizmos라는 스크립트를 컴포넌트 시켜줍니다.
using System.Collections;
using System.Collections.Generic;
using UnityEngine;
public class MyGizmos : MonoBehaviour
{
public enum Type { NORMAL, WAYPOINT}
private const string wayAPointFile = "Enemy";
public Type type = Type.NORMAL;
public Color _color = Color.yellow;
public float _radius = 0.1f;
private void OnDrawGizmos()
{
if(type == Type.NORMAL)
{
Gizmos.color = _color;
Gizmos.DrawSphere(transform.position, _radius);
}
else
{
Gizmos.color = _color;
Gizmos.DrawIcon(transform.position + Vector3.up * 1.0f, wayAPointFile, true);
Gizmos.DrawWireSphere(transform.position, _radius);
}
// 기즈모 색상 설정
Gizmos.color = _color;
//구체 모양의 기즈모 생성. 인자는 (생성 위치, 반지름)
Gizmos.DrawSphere(this.transform.position, _radius);
}
}
그리고 Way를 이런식으로 배치를 시켜주면 됩니다.

Way오브젝트가 이제 AI들이 움직일때 지나가야 하는 포인트가 될것입니다.
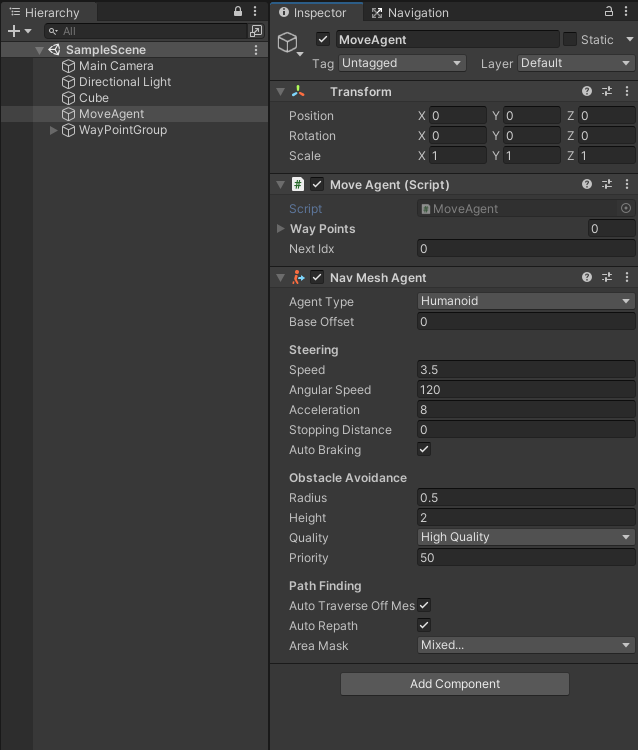
또한 Cube 또는 Spere나 빈게임오브젝트든 아무 오브젝트 하나를 생성하여 위 사진과 같이 NavMeshAgent를 컴포넌트 한후 MoveAgent라는 스크립트를 만들어 컴포넌트 시킵니다.
using System.Collections;
using System.Collections.Generic;
using UnityEngine;
using UnityEngine.AI;
public class MoveAgent : MonoBehaviour
{
//순찰 지점들을 저장하기 위한 List 타입 변수
public List<Transform> wayPoints;
//다음 순찰 지점의 배열의 Index
public int nextIdx = 0;
//NavMeshAgent 컴포넌트를 저장할 변수
private NavMeshAgent agent;
private void Start()
{
agent = GetComponent<NavMeshAgent>();
agent.autoBraking = false;
var group = GameObject.Find("WayPointGroup");
if(group != null)
{
group.GetComponentsInChildren<Transform>(wayPoints);
wayPoints.RemoveAt(0);
}
MoveWayPoint();
}
private void MoveWayPoint()
{
//최다 ㄴ거리 경로 계산이 끝나지 않았으면 다음을 수행하지 않음
if (agent.isPathStale)
{
return;
}
//다음 목적지를 wayPoints 배열에서 추출한 위치로 다음 목적지를 지정
agent.destination = wayPoints[nextIdx].position;
agent.isStopped = false;
}
private void Update()
{
// NavMeshAgent가 이동하고 있고 목적지에 도착했는지 여부를 계산
if (/*agent.velocity.sqrMagnitude >= 0.2f * 0.2f &&*/
agent.remainingDistance <= 0.5f)
{
// 다음 목적지의 배열 첨자를 계산
//nextIdx = ++nextIdx % wayPoints.Count;
nextIdx = Random.Range(0, wayPoints.Count);
// 다음 목적지로 이동 명령을 수행
MoveWayPoint();
}
}
}
이 MoveAgent스크립트를 쓰면 wayPoiont지점들을 랜덤으로 지정을 하여 오브젝트가 랜덤으로 지정되는 포인트들을 지나가게 됩니다.